Restoring a 1946 Mercury Woody
- Part 4
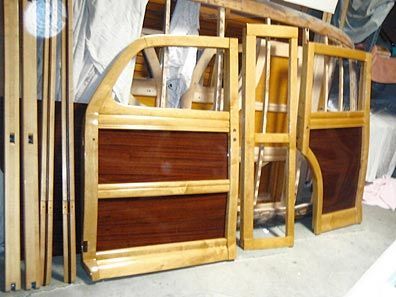
Wood Replacement and Refinishing
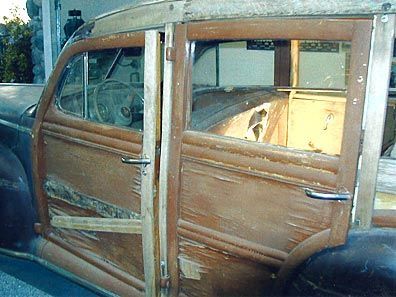
1946 Mercury Woody Wood ReplacementThe 1946 Mercury I am restoring, bad wood that was in such bad shape, it could not be restored to an acceptable level. Because of this, I elected to have the wood replaced by Ron Heiden of Heiden’s Woodworking in Leaicadia, California, (760) 753-8047. Ron is recognized as one of the very best, and his waiting list of over a year validates his reputation.
There are several other excellent woodworking shops throughout the states. In Southern California, there is Ron, Chris Messano in San Pedro (310)547-0298, Doug and Suzie Carr in Long Beach (562) 498-8730, and Richard Machut in Carson (310)768-8803.
All of these shops specialize in wooden car bodies and all have long lead times for entire bodies. However, pieces can be purchased individually with reasonable lead times. If you have fairly sound wood and only need a piece or two, give these shops a call, they will help you out.
As for refinishing, almost all these shops offer reasonable prices on revarnishing a car, and it will turn out beautifully. If your wood needs to be stripped and revarnished, it will be substantially less expensive for you to do the work yourself.
I have two other cars that I varnish about every two years and they have a very nice original looking finish. I varnish with a brush and I do not wet sand and polish them. They have minor brush marks in the varnish, but overall they have a nice appearance. I will explain my process for achieving a good finish at home using traditional varnish.
In order to make the job easier you ‘ll have to remove several wooden parts from the car. Start with the four doors, take off the inside panels of the doors as you will varnish those separately. Take off the rear tailgate and tailgate window assembly. Finally, remove the ¼” panels in the rear quarter assemblies.
The following procedure can be used for each of these individual parts and the parts still on the car: If your car has years of crusty old varnish, you will need to sand it down to the original wood or to a good solid varnish. You can use an orbital sander with 80-100 grit paper to cut through the old varnish. Sears sells a small sander with a point on one end called “The Mouse” it does a terrific job of getting in the comers. Try not to overly sand mahogany veneer panels as it is a soft wood and it will sand through, showing up the final finish.
Please realize that the mahogany panels, if necessary, can be easily replaced. If you have one or two defects or delaminations, but otherwise have descent panels, seek advice from one of the wood shops mentioned earlier, or visit Alexander Restoration in Los Angeles. Nick’s men are amazing at restoring flaws in laminated panels. They can also repair wood framing members which have flaws to an as-new condition or duplicate any wooden part for your car to perfection. (323) 583-7793.
Once the sanding is done, now comes the varnish rebuilding process. I have used several varnishes and in my opinion, Traditional Man-0-War Spar Varnish is the toughest to work with. If you happen to place a little too much in a corner, it tends to wrinkle badly and it is slow to cure for re-sanding. I know most professionals like Interlux Brand, but most of the pros spray their finishes. I prefer Z-Spar #2015 “Flagship” marine varnish sold at West Marine Shops. It cost about $27.00 per quart. This product can be wet sanded and buffed if so desired.
The other crucial element of a great varnish job is the brush. I have spoken to Rick Mack in Washington and he uses “Badger” brushes which produce beautiful finishes on his projects. I tried them, and cannot master them. Instead, I use the high quality foam brushes, both 2″ and 3″ sold at West Marine and Home Depot. They cost approximately $1.50 each, but they are worth it. They apply a beautifully even coat without the brush marks.
So, with all the preliminary sanding done, pour about 1/8 of a quart of varnish in a plastic cup, I use the big red ones, pick a small part to start with and place it horizontal if possible, tape off as needed. Wet down the ground around you, preferably in an enclosed garage. Blow off the part with a compressor, use a tack rag to wipe down the entire piece twice. Start in one corner and work your way across the piece. Work quickly as the varnish will begin to set-up in 10 or 15 minutes. If temperatures are warmer than 80° F, you may thin the varnish about 10% using mineral spirits and that will make the varnish brush on easier.
Keep an eye on the areas you have already varnished as “runs happen” and you have to go back and re-work them. The foam brushes lay a nice even coat of varnish. All you need to be sure of is that you coat the entire piece, don’t leave any dry spots. It will take 3 or 4 separate coats to get a good result, more coats are your option. In between coats, you need to scuff the previous coat with either a green scuff pad by 3M or use 320 sand paper. You just need a scuffed surface for adhesion.
When done, you can clean the brushes. However, after 2 or 3 uses you will have to discard the brush and use a new one as they will wear out. Do not pour varnish from the cup back into the quart can, it will contaminate what is left in the can.
Once you have reached the desired finish, reinstall the parts, but only after at least a full day of drying time.
Should you need new screws, washers, or other hardware for your Woodie, call Ed Clarke in New York, he has all of the original fasteners; including the unusual oval head slotted door screws for the blind nuts, (914) 834-0326, just ask him for his catalog.
One trick that I used in varnishing the roof slats is sliding 8½ x 11 paper through and over the slats to protect the cotton padding from varnish. It works great if the paper is heavy bond and will come out rather quickly when done.
After you have completed a part, like a rear quarter for instance, and everything looks great except for one small piece of the wood, do not re-sand and revarnish the whole piece. Wait a day or two until the varnish is dry, tape off that piece using any seam or edge to isolate that area to be coated. Lightly sand just that area, varnish as previously discussed, wait a day and pull of the tape, it will now look perfect.
If you want the elite look, wet sand with few drops of liquid soap in a gallon of water using 1200 sand paper. Either hand polish or use a buffer with #84 McGuires rubbing compound or 3M brand available at paint stores or on the net. Polish until you drop and the car’s wood will look like glass and you will need a rest. But you can gawk over your quarter panel as you rest. Follow these simple guidelines and you will have a real nice finish.
Replacement Glass and Channels
My project car had mostly original Ford glass. Each piece was either cracked or delaminated and not of the caliber needed for a concourse restoration.
When it comes to glass for these cars, many shops can provide appropriate safety glass from your old windows which they will use for patterns. Since there is no curved glass, the cost is relatively low compared to other cars of the era.
For basic replacement glass, call around to your local shops and ask if the shops can duplicate your damaged pieces. You may wish to purchase a tinted glass if you are replacing the entire set and wish to give your car that custom look.
What can make glass expensive is obtaining the original date code on every piece of glass. The glass is again clear safety glass; either laminated or tempered, however there will be a small Ford logo with an oval around it in the comer of each piece. Also within the oval are three letters that indicate the date of manufacture of the glass itself.
The way the codes are read is actually quite simple. Each letter and their numbered position in the alphabet are used to indicate the month and year of manufacture.
There is a single letter on the left side of the logo which represents the month, A represents January, B represents February and so on. On the right side of the logo there will be two letters, in my case DF for 46.
If you are restoring a concourse car, it is imperative to preserve the original glass or replace the damaged glass with the correct date code.
In most cases, the glass was manufactured with the codes all facing one direction. In other words, you can read the logo on one side of the car from the exterior, however on the other side you have to be inside the car to properly read the date code.
I have found a company in Oregon that specializes in Ford date coded glass and this company is actually a licensee of the Ford Motor Company.
The Company is Sanders Reproduction Glass and the contact is Nancy Smith at (503)648-9184.
A full replacement set for a 46 to 48 Ford Woody with date codes runs about $1,250 plus shipping. Nancy is very thorough and quite pleasant, turnaround is about 6 weeks.
As for the felt lined channels and sweeps used for the glass, all of them can be purchased from J.C. Whitney and Company as well as many other companies such as C.W. Moss. Just remove the pieces you would like to replace and measure them carefully. You can match the dimensions with those offered by Whitney and CW Moss in their catalogues. Ed Clarke sometimes offers channel kits for woodies including seals for the rear windows. You may call him at (715) 462-3756.
Tires, Wheels and Hubcaps
Tires on a 46-48 Mercury are different than those which came on Fords. Mercurys generally came with 15″ rims and a 650 to 700 series tire. Fords, generally came equipped with 16″ rims and 600-650 series tires.
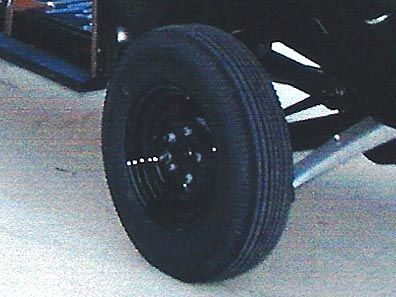
To purchase a correct tire for your car, call Coker Tire (800) 251-6336. They can provide you with the original specifications for your year and make of car. They also offer a full line of radial and non-radial tires in black or white walls.
They have a warehouse in Fresno, California and in Tennessee. You can have 4 or 5 tires shipped to you for about $60.00-$75.00 plus the cost of the tires.
Coker also offers a full line of replacement rims either powder coated or primered for just about every car. They are fully described in their catalogue.
There are several other sources for tires, but Coker seems to be the largest and most eager to assist. They are also willing to exchange a tire, if not used, and sent back within 30 days or so. If for some reason Coker does not have the rim you need, check with some of the used parts stores like Early Ford Parts in San Dimas, California (909) 305-1955.
The owner Bill McGrath, has row after row of good used wheels among countless other parts including stainless, trims, fenders, bumpers, and about one billion small parts all for Ford and Mercury. He is fair with his pricing as well.
Hubcaps are generally easy to find for 46-48 Mercury and Ford except for the 46 Mercury. The 46-48 Ford and 47-48 Mercury hubcaps are available through Macs (800) 777-0948 or Bob Drake (800) 221-3673. They both offer perfect reproductions for about $45.00 each.
Do not buy used dented hubcaps on E-Bay for these years and expect to have them repaired for a lesser price. You will pay more to have repairs made and they just won’t look as nice, buy new ones.
For a 46 Mercury, like the one I am restoring, hubcaps are not currently being manufactured. They were remade in the sixties by a couple of companies and some poor quality repros are still out there being sold on eBay just to confuse the whole issue.
Here is the straight skinny on 46 ‘Mercury hubcaps. You can either look on eBay as there seems to be one offered every two weeks or so, you can call all of the 46 Mercury fellas in the NWC roster or the Early Ford V-8 club roster and ask if they might have one left from their project. You can place ads in either of these clubs monthly magazines. No matter how you get them, expect to pay $50-75 each for decent restorable to excellent quality hubcaps. If you need to have them restored or polished, ask your local stainless specialist or polishing shop to see if they can do the restoration work. If not, David Stromberg at Buff-Stuff in Washington can do it and he will amaze you with the results. He is not cheap, about $50-100 per hubcap, but they look perfect when completed. I’m sure he will do other models and years as well if your car is not a Ford or Mercury (360) 260-0434. About the only hubcaps, which are not restorable, are those, which have been ground into a curb. The 46’ Merc hubcaps were famous for this because they stuck out beyond the rim and were an easy target for grandma as she was parking at the Piggly Wiggly.
After the polishing is done, you can hand paint in the Mercury Man by first cleaning the area with lacquer thinner. Using “bright red” One-Shot lettering paint, sold by Eastwood Company (800) 345-1178, and a good small brush, carefully paint on the face. If you go over the lines, use lacquer thinner to remove the paint and start over. Once completed, set the hubcaps aside for a couple of days to assure full cure of the paint. This “One shot” paint is the same paint used for the Mercury emblems and hood ornaments after chrome work is complete.
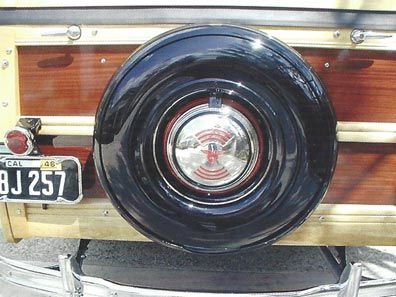
If your car has beauty rings, they too are offered by Bob Drake and Coker at about $25 each. One good point to remember, the rear tire cover on a woody uses a smaller tire than those actually doing the daily driving. In my case the Mercury has 4 tires that are 710 x 15s. The steel tire cover would never go around that large of a tire so I used a 620 x 15 and it seems to fit appropriately. Keep this in mind when ordering your new set of tires.