Restoring a 1946 Mercury Woody
- Part 3
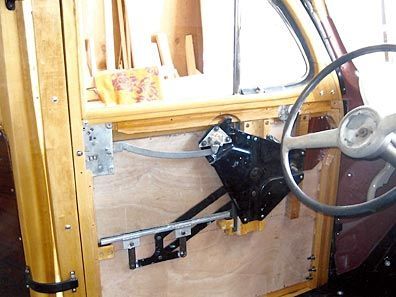
Window and Door Mechanisms
1946 Mercury Woody Window MechanismMost window regulators are bullet proof on these Woodies and should work indefinitely. However, many early Ford shops sell rebuild kits for the winding shaft assemblies. If for some reason the gears or other parts of your mechanisms are not functional, it may be simpler and less expensive to buy an entirely new or replacement unit. You can find them quite commonly on eBay for around $75.00 – $100.00.
The latch assemblies are also found for a similar price on eBay. However, about the only part of a latch assembly that wears out are the springs. Again, most early Ford parts stores have matching springs for about $3.00 – $6.00 and although challenging to install, these replacement springs will revitalize your latch assembly to an as new condition.
The windwing assemblies can be fully reconditioned and parts are available. Drake makes replacement rubber seals (be sure to specify station wagon) and they are spot on for quality and fit. You’ll have to grind some rivets to remove the old rubbers. Be patient, there are some fasteners hidden within the rubber so be methodical and you will be triumphant. Should you have a stripped gear in your windwing assembly, replacements are available from the same sources. Again, you may have to grind a rivet or two and the rivets that come with the kit may not work well, so use a standard rivet gun ($20.00 at any Home Depot) to securely fasten the pieces. You could even use small screws and nuts if absolutely necessary.
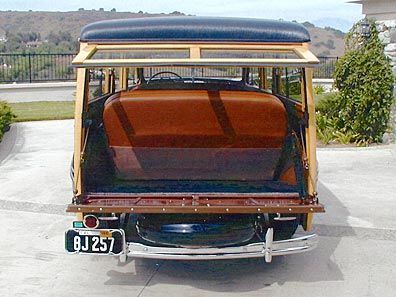
The tailgate latch assembly is complex looking but, when disassembled, very basic. If your handles sag and do not stay horizontal when the tailgate is closed, it is either a lack of lubrication or weak springs inside the strikers. Try removing the entire assembly from the tailgate, you will have to remove the handles by removing the nut; which is visible from the inside. When removed, try shooting lubricant into both ends of each striker. The striker is the tongue which catches on the striker plates when closed. It has a housing around it and you will need to get the lubricant into the housing. Also, lubricate the other connectors to achieve a fully lubricated mechanism. If the strikers do not rebound after pushing them in by hand and you have fully lubricated all components, it is likely that the springs inside the housing are weak or fully rusted beyond function. Mine were all but gone. I had to grind the rivets from the blind side (the side you don’t see) and carefully dislodge the housings from the assembly.
I found the springs inside to be 30% rusted away and not functional. I bought replacement springs at a local hardware store, loaded the strikers with grease after cleaning them with sandpaper, and spot welded the housings back in place with a wire welder. Gas welding is too hot and will remove the tempered spring strength. Any small welding shop can do this for you. Once back together, it is like a new mechanism and ready to go.
The welding will ruin the paint. So this would be a good time to try the primer gun I mentioned earlier, as well as, the single stage brown paint. Give it a try, and be careful to spray lightly until you get good coverage. Let it set about 20 minutes, then give it one final medium wet coat for a good finish.
Sheet Metal and Stainless Trims
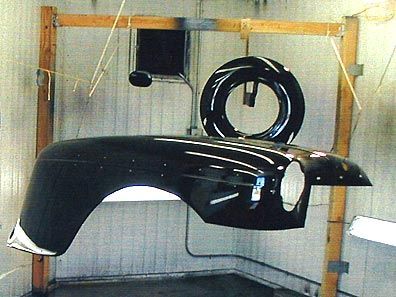
If you are missing some sheet metal or have a part beyond reasonable repair, Ford and Mercury sheet metal are relatively easy to find at reasonable prices. Don’t spend 8 days trying to straighten a fender that just won’t straighten or has been rusted away beyond repair. Very few sheet metal parts are worth it other than the floor and cowl. I spent 4 months on my floor, but it was important to me to retain this original component for the car’s history. Otherwise, I replaced the lower front grill surround on one side, my driver’s side front fender, and both rears, mostly due to rust and previously ill repaired damage.
If you are serious about restoration, then you should give body and dent removal a try. All you need is patience and a will to try. It has taken me over 30 years of trial and error to give you the following information. As I recall, even my first attempt on a 1962 Ford van provided decent results. So I believe anyone can successfully remove dents and shoot paint with good results.
In a nutshell here is the amateurs guide to body and paint: Removing dents starts with pounding the dents out with a small body hammer. Use a larger hammer as back-up on the other side of the dent and knock out as much of the dent as possible. Once it feels close to the original contour, either grind the damaged area, or sand it thoroughly with 60 grit paper beyond the dents perimeter about 2″ on all sides. I use a small 3″ air grinder with a flexible wheel so it doesn’t remove to much of the steel. A Makita hard wheel grinder is to abrasive, so if you must, use 60 grit sandpaper to rough up the dented area to expose the steel. You need a good cleaned scratched or ground surface for the body filler to adhere.
Estimate the amount of Bondo or body filler needed to fill the dent, or to fill in the contour to a level about 1/8 of an inch high above the desired surface level. Mix the filler as described in the earlier part of this article and apply quickly to the dented area. Apply beyond the dents perimeter by about 2″ using a 3″ putty knife or Bondo spreader. Let the filler cure for at least 30 minutes. Using a sanding block, or a longer 18″ professional sanding block, use 36 or 60 grit paper to sand the filler to the desired level. This is where the trial and error comes in. You may sand down too much and have to reapply, but that is okay, just do it again and sand again. When you can run your palm over the dented area with your eyes closed and feel absolutely no ripples or elevation changes, you are done with the body filler stage.
Next comes primer. Mix as previously described 50% primer and 50% lacquer thinner or use premixed primer and coat with a medium to heavy coat. Let it dry at least overnight. When ready to sand, spray a light coat of black spray paint over the area with primer. It need only be a light mist of paint to help expose the heavy sanding marks in the primer. Use 220 sandpaper on a sanding block and sand it smooth. Don’t sand all the way down to metal as that will create a ripple effect. If you need to shoot another coat of primer and re-sand, go ahead; this is where the patience comes in. Once you have finished removing the scratches and sanding marks from your repair area, give the area one last medium coat of primer covering all of the 220 sanding marks. Let that cure overnight and you are now ready to use 320 or 400 grit for final sanding prior to paint.
For purposes of simplicity, I will describe painting with single stage urethane. First, after sanding the entire part with 400 sandpaper, you will need to blow off the sanding dust with air, and wipe down the part with a moist clean towel. Blow the part off with air a second time to remove lint. Use a “tack rag” to wipe down the part a final time. Wet down the area around you to hold down the dust, don’t spray when wind is blowing even slightly.
Mix the paint as directed 4 to 1 or 6 to 1. I always add about 10% acetone to achieve an easier flowing paint. Mix the paint in a plastic paint mixing cup then pour the mixture through a strainer into the paint gun cup.
Use a piece of cardboard to adjust your paint gun. Spray the cardboard and adjust the fan spray and amount of air pressure. Whether you use a traditional high pressure gun or the new low VOC gun, adjust the air pressure so over-spraying is minimized. Apply a light coat of paint over the part, shoot every corner and edge to achieve 100% coverage. Let the part set for 10 to 20 minutes then return and give it a second medium wet-coat. Be careful not to run the paint. Let it sit overnight, but don’t allow the part to get wet or sit out in the weather. Move it indoors when possible, usually this can be done after a couple of hours, but try not to touch the paint until the next day.
It is difficult to give all of the information needed to cover every aspect of painting in such a short article, but with repetition and patience, you can get excellent results even at home. Stainless is simple. If it has dents, most polishers and chrome shops have stainless specialists who can perform miracles with stainless trims. If you are missing a piece, almost all Ford stainless is being reproduced by Bob Drake, you can look on the web or his catalogue. Mercury stainless is a bit more difficult, but Brownlee’ s in Lawrenceville, Georgia has much of it. The only pieces which are seriously difficult to locate are the rear Woodie fender trims. They are gold or at least priced as such, if you can find them. Most of them are tucked away in many National Woodie Club Members’ attics. Try Woodie Times, I have had excellent luck with my ads. I am still searching for a restorable or NOS driver’s side rear-wide fender stainless for my ’46 Mercury. If you know of one, please give me a call.
The exterior handles can be disassembled by filing off the small depressed part of the shaft allowing the washers to come free. You can even substitute an NOS handle from a coupe with a little engineering. Just tack weld a couple of beads when all is reassembled and you’ll have great handles.
Dashboard and Electrical
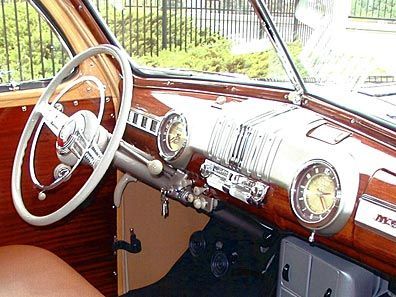
1946 Mercury Woody DashboardThe dashboard of 1940 – 1948 Ford and Mercury cars will dismount by removing a few bolts. My dash was factory painted with a copper red color and not wood grained. After some research, I discovered that a few select Woodies in early 1946 did not leave the factory wood grained, they were painted a single color until auto production (which included wood graining) had fully resumed after the war.
I felt a wood grained dash was essential to this project, so I pulled the dash out of the car and sand blasted it to the raw steel. It had a few dents, so I filled them with body filler, (just like the fenders) primed and sanded it several times until it was back to original smooth condition and ready for final wood graining. I did the same thing with the inside window garnish, the glove box and the ash tray tops.
I took all of them to Bob Kennedy in Whittier, California, (562) 693-8739. Bob has been wood graining for 30+ years and around Southern California, so he is the man for concourse dashboard wood grain restoration. He is a truly nice fella and fair with his pricing at about $600.00 for the above pieces and the dash. The only problem, is that his backlog is usually 8 months to a year, so again, get the dash to him early in your project.
I don’t recommend trying to wood grain yourself unless you are an extremely gifted artist or willing to accept a lesser quality finish. Wood graining is tough and takes years to learn. For the money you would be better off having an expert like Bob Kennedy do your work.
The center plastic on my dash was severely pitted and chalky so I hand sanded it, loaded it up with Nason Primer (As previously used on the exterior body work) and sanded it down by hand obtaining a beautiful result. New plastic for a Mercury is available through Brownlee’s, but it is pricey at about $600.00. I spent about 6 hours on mine and matched the paint with a Honda metallic color. The final product is beautiful and other than a slight bend in a couple of places, it looks like new.
Ford plastic for all years is available for less than $200.00 in original colors or chrome. For that price, it would be easier and cheaper to buy a new set from any one of the several vintage parts houses.
The gauges also needed help, so I prematurely sent them to the first gauge and speedometer guy I could find. It was a mistake. Although the gauges are new looking and I assume they will work, (some were replaced with NOS) I paid three times too much. I could have bought all new NOS (New Old Stock) gauges on EBay with some patience for about $500.00. My advice is look on eBay for the 4 gauges, they are quite common, and call a local vintage speedometer shop for a quote on re-building the clock and speedometer. This will ultimately save money for you.
I did not have a radio, they too are common on eBay and several vintage radio shops. Buy one that works for about $150.00 – $200.00, have the face rechromed and buy new knobs if needed from any of the parts houses I mentioned earlier in the article, the radio will look excellent.
Dash knobs for Fords are readily available in all colors for 1940-1948 and for very little money; replace as you need to or so desire. Mercury knobs are not available and mine were shot, but I did have three of the four needed. I sanded them, filled the cracks with Bondo, primed them and found a color matched single stage enamel to spray them. Afterwards, I taped off each of the letters with lacquer tape, (It’s a light green and sold at most auto paint stores and good hardware stores) then I lightly bead blasted the letter imprint so the red paint would stick. Finally I used a red “Krylon” spray paint and gave each letter a light coat off red paint. I carefully pulled off the tape and got an excellent result.
The only tough part was, I did not have a choke knob and could not find one anywhere. So I bought a light switch with an “L” on it for $40.00 on eBay. I filled in the “L” with body filler, primed it to remove all scratches and made it fully ready for paint. I took a 1/4 piece of tube steel, about 2″ long, cut away one side of the tube making a “C”. I mounted it in my drill press, firmly mounted the knob in a vice, heated the “C” with an acetylene torch, and carefully lowered it down into the knob, burning a perfect “C” into the face of the knob. I lightly sanded the face of the knob, painted the knob with the base color and red letter as mentioned earlier and it looks perfect.
Most people have no idea of the magnitude of effort and time that goes into these vehicles. I spent over l0 hours on one knob, but it was my small triumph to make the knob work.
Wiring for Ford and Mercury Woodies are almost identical. Ford’s original wiring for virtually all components are widely available through C.W. Moss, C&G, and Brownlee’s, among others. Mercury’s original wiring is available through Brownlee’s. Expect to pay about $500.00 to $600.00 for a complete set of original wiring. Wiring diagrams are available on the web, or in books also available on the web. If you follow the diagrams and are patient, you can do the wiring yourself. I, personally, am only going to wire part of my car because I paid so much for the gauges, and I would have heart failure if I smoked them, I want a professional to do those connections. If you are building a hot rod, there are several custom wiring shops throughout the states. In Southern California, the best custom wiring shop I have found is Fred Ingles Custom Wiring. He is fairly priced, yet he and Zak, his associate, are magicians and truly make a significant difference under the hood of your car. They did my ’41 Woody and it is remarkable. Their number is: (909) 986-2231.