Restoring a 1946 Mercury Woody
- Part 2
Repainting the Frame and Drive Train Parts:
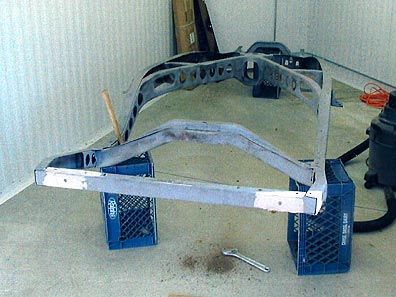
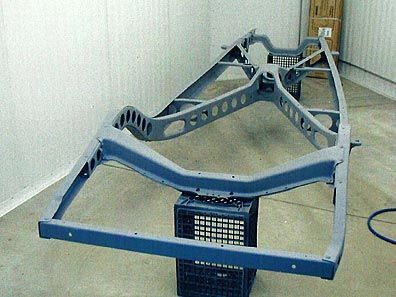
1946 Mercury Woody Powder CoatThe easy way to accomplish this part of the process is to have everything powder coated. For most people this is a viable way to go. It is relatively inexpensive, about $200.00 for a woody frame and priced per piece on everything else. The finish is generally excellent, unless you have excessively dented or pitted parts. In that case the flaws will show in the final finish. You can choose from several colors and powder coating provides a durable glossy finish.
In my case, I had some pits and dents and needed a glossy finish on the frame and semi-gloss on the casted parts. This car is a concourse project, so every part has to look as if it was just manufactured in the Mercury plant.

So, I filled the pits and dents, and straightened the bent frame members. I used body filler from a local automotive paint supply house. Body filler is a mystery to many, so they never try it. I have news for you, it is the most simple product to mix and sand, that you may kick yourself for waiting so long when you finally give it a try.
Body filler or Bondo as it is known to most, is a two component system which sets up in minutes and is fully sandable in about 20 minutes. To mix it, there is no science. Start small using a 3″ drywall putty knife, take enough body filler to fill a shot glass, put it on a clean piece of cardboard, next to it put about a corn nut sized amount of hardener and mix the two together rapidly using the putty knife. As they mix together, you need to be sure all of the hardener is evenly mixed into the filler. When the color of the mixed product is consistent, you are done. This will take about 30 seconds.. You will have about 2 to 3 minutes at 75° – 80° to put the filler where needed. More hardener would speed up the process less will slow it down. Temperature will also affect how quickly it will react. Fill in the pits and holes as you see fit, the excess will sand out nicely.
At this point I am referring to using body filler to fill voids the frame, brackets, and other body related steel pieces. As long as the piece is sound, it can be filled and shaped to look like new. Body work will be addressed later in this article.
After you have used filler primer is needed. Again you will need a compressor and now a primer gun. Lowes, Home Depot and Sears all sell good quality spray guns or spray gun kits for $50.00 to $100.00. The gun does not have to be a high dollar Binks or De Villbiss to work well. My primer gun is 20 years old and cost only about $35.00 back then. Again clean dry air is preferred, so an air dryer should be used on the compressor for good result, but is not required for good results with primer. I am in Southern California, and we can’t blow our nose without a permit. Nonetheless, the local automotive paint store sell paints and thinners approved for our environment. We are severely limited on types of paint sold and how much they can be thinned prior to spraying.
As a privateer, or a non-professional paint shop, we are not regulated as stringently. However, I try to follow the rules as much as possible. Our local auto paint supplier offers a pre-blended primer which is ready to use. Just stir it up, put it in the gun and shoot. Personally I like to use Nason Ful-Fil light gray primer which is not sold locally. I order it over the net and it comes right to my door. I mix it 50/50 with a good lacquer thinner and the results are great. This product can be loaded up to 1/8″ thick and sands like butter, it also has a very fast sanding time. The other pre-mixed products are satisfactory, but cannot be built up as thick and do not sand as easily. But don’t be mistaken, the pre-mixed primer will definitely work well if used, just not as efficiently.
When shooting primer, turn the fan control (upper screw knob) knob to create a nice even fan spray. Turn the volume control knob (lower knob) to allow the trigger to be depressed all of the way.
Start with low pressure and adjust the pressure either at the compressor or with a small pressure regulator at the gun, which is what I have, to allow just enough air through to spray cleanly without a lot of overspray. There is a medium setting for primer use, and it varies on all guns, just adjust the pressure until a good spray is achieved with some, but not excessive overspray.
Let the primer set overnight after spraying to allow for proper cure. The next day spray a light mist (barely detectable) of cheap black spray paint over the areas which were severely pitted or scratched. This light mist will allow you to better see the pits and flaws as you sand down the primer. In most cases, it will take 2 coats of primer to be completely ready for final paint.
Once you have prepared enough frame parts to spray a certain color, you can choose the method of painting. By far the easiest method to paint a frame or related drive train parts is by using quality cans of spray paint especially made for frame parts.
The best source I have found is the Eastwood Company. They offer gloss and semi-gloss frame paint for about $10.00 per can. They also offer frame paint kits with enough to do an entire frame for about $75.00. These products are very good and will provide a fully adequate and durable finish for any frame and are especially easy to apply. Be aware of the directions, if you put on a second coat too early, the paint will wrinkle badly and you will need to sandblast and start over. If you follow the directions and have properly prepared the parts, the results will make you proud.
Another method of painting the frame, is using the primer spray gun I mentioned earlier. Eastwood sells frame paint by the quart or gallon and it can be sprayed with a gun for a beautiful finish. Again watch for the re-coat times, it can be disastrous.
I prefer to use my gun and a single stage enamel or urethane at about 35.00 per quart. Single stage means you mix it with a hardener and spray only the color coat, no clear coat is required. This type of paint has been used for 50 years and always provides a good hard finish, especially in black. The difference is, these paints normally require a spray booth for premium results. I find that if I spray early in the morning, wet down the area around me with water, and use a good tack rag ($1.00 at the paint store) which removes all of the dust, I get excellent results. I mix the paint as directed on the label, but I also ask the fella where I buy the paint, what the mix ratios are and mark the ratios on the various cans with a black marker. That way, 2 weeks later I haven’t forgotten what goes with what.
No matter what I spray, I use a high quality breathing assembly, never spray in an unventilated area, wear long sleeves, pants, gloves and eye protection if possible. I purchased a $15.00 jumpsuit to wear when I spray and it works great, I look like an absolute dork, but I save my clothes.
After you spray, the parts will need to be put somewhere to cure for at least a day or two. Once they have cured enough to move, 6 hours or so, try to handle the parts as little as possible, but put them in a protected environment, don’t leave them outside.
For other components which need to be painted like wood brackets, hinges, latch covers, etc. you will need to buy the single stage paint in brown at about $50.00 per quart with hardener and spray as I outlined above. In some cases you may have to make a jig or stand to hold the part at a proper angle for spraying. It is all a part of the process.
One point to reiterate, keep the gun pressure at an adequate rate, the more pressure the better and flatter the paint will spray, but on small parts it’s easy to get a run. Check closely for coverage, its real easy to miss a spot.
Reassembly of the Frame and Drive Train:
1946 Mercury Woody Frame brakesStart with the brake systems. Check the steel brake lines, especially the ends. Replace all rubber lines which attach to the wheel hubs. Blow out all of the lines as you reassemble to reduce the risk of contamination. There are copper washers at each brass fitting, be sure to replace each of them to eliminate leakage. Check the condition of the master cylinder and replace if necessary, rebuild if possible. Check each of the wheel cylinders, if they are leaking or frozen, rebuild or replace as needed. There are two eccentric bolts on each of the brake backing plates at each wheel.
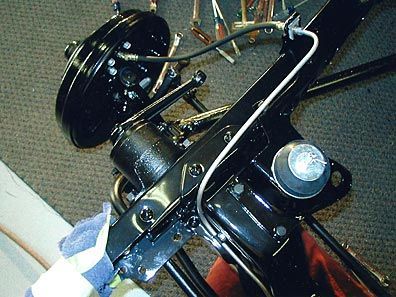
To properly adjust the brakes, start with the back wheels and while the car is off the ground spin each wheel and turn the eccentric bolt until the wheel has friction. Do both bolts and the wheel should turn with a slight rub if adjusted correctly. Do all 4 wheels, then bleed the brakes. Again start at the rear and have someone pump the brakes with the master cylinder full. They can pump up the brakes and each wheel cylinder can be bled about 4 times before the master cylinder needs to be filled again. Bleed until air is out at all 4 wheels and you should have a good set of brakes. There is also an adjustment on the main shaft of this master cylinder if the pedal needs to be raised. Consult a professional if anything feels awkward.
Put on the leaf springs and mount the shocks. Some shocks may not reach until more weight is off the car, this goes for the stabilizer bars too. If you need shock links, bushings, shackles or the like, all of these parts are available at the vendors mentioned early in the article.
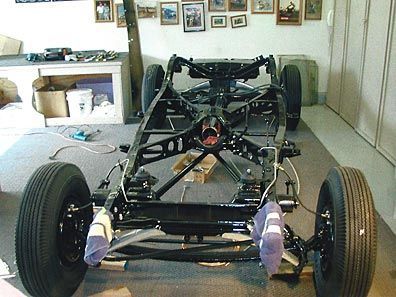
Generally mount every part on the frame including the engine prior to mounting the cowl and floor. It is significantly easier to mount all parts and the motor/transmission assembly without having to deal with a floor in your way.
As I mentioned earlier, I elected to purchase a Columbia rear end with overdrive for this car. Please realize that original standard rear ends can be built and gears changed to run at 65mph. I chose a Columbia as a preference as I have it in my 48 Ford Woodie If you choose to do the same, expect to pay about $5,000 for a rebuilt assembly with controls. The foremost authority on Columbia Rear Ends and Controls is Dan Krehbiel at 909. Dan is extremely helpful and a heck of a nice guy. And yes he is Tim Krehbeil’s father and is the source of Tim’s smarts and pleasant attitude. Dan sells almost everything one would need to rebuild a Columbia Overdrive and a standard rear end as well.
My gas tank was completely rotted out and rusty. I bought a new one from Bob Drake Reproductions and it is an exact copy. He also sells the sending unit as well. I purchased the original style copper coated steel gas line from Roy Nazewicks and my set up was complete.
My motor was set in with a small cherry picker with the trans bolted in place. It was not easy, but not ridiculously difficult. I had a tough time getting the transmission coupler to line up with the drive shaft. After 30 minutes of struggling, I think my threats scared it into place.
I bought a new replica muffler from C & G Auto Parts along with all of the proper mounting hardware and muffler pipes. It all fit well. The remaining small parts went on well and I was now ready to mount the cowl and floor.
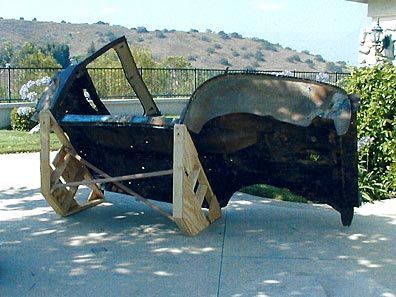
Repairing the Cowl and Floor:
1946 Mercury Woody cowl & floorIn my case the floor section between the cowl and rear riser had to be cut out and replaced. I found a floor in Georgia, and had it shipped to Los Angeles.
I cut out the old floor and welded the new one in place. One thing to remember is to be sure the original cowl angle is kept intact. Bolt a steel angle from the cowl upper hinge location to the rear wood bracket extending up from the inner fender well and be sure it is snug. If it moves, it could throw off the angle for the doors and all other wood work.
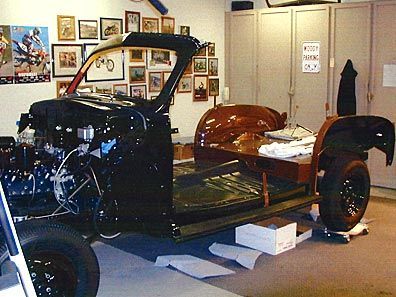
Once the floor was welded in place, I spent countless hours using body filler to hide all welds and make the replacement undetectable. The results were good, but it was an enormous task. A rust free floor would have saved 200 hours of labor and about $2,000.00.