Restoring a 1946 Mercury Woody - Part 1
February 2006
When I offered to write this article, I was dead set on writing it for the average guy who does much of his own restoration work or would love to try. I also wanted to be sure that I pointed out my mistakes, for the benefit of others, and also to poke a little fun at myself. At this writing, I am half-way through a complete frame off, ground up restoration on a 1946 Mercury Woody and already have several laughable mistakes to discuss along with some invaluable insight on how to take a heap of junk and make it the car of your dreams.
Choosing and Buying the Right Car
I have two other completed Ford Woodies which are in excellent condition, a 1941 hot rod and a 1948 original wagon. About 18 months ago, both of my cars were done, I wasn’t currently involved in any major projects at home and my freezer construction business was doing fine. I found myself on the couch one night, watching wheel of fortune and I said to myself, “I have reached a new low. I have to get a new project now or my family will start calling me spud.”
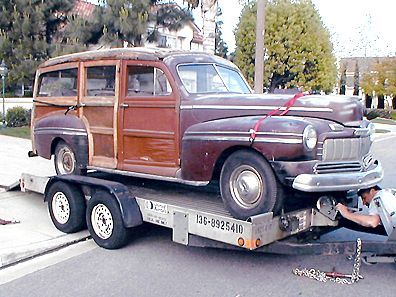
I looked on E-Bay for about 2 weeks and put a bid in on the 1946 Mercury which I eventually won.
Point one: Make sure you take your time looking for the right car, preferably one without rust. I rushed to a purchase and ultimately bought a rusted out heap. The ad in E-Bay said there was some rust in the floor. When I e-mailed the seller 4 times with questions, he did not answer in any fashion. But I took a risk and bought the car. When I arrived to pick it up, my son who was with me at the time, saw the car on the street in very poor shape and asked me if I was actually going to stop and buy the car. I told him I had already paid for it, and he said without hesitation, “you’ve been hosed.” The floor had “little rust” because there was not much of it left, the wood which was advertised as 80% restorable was 80% gone or beyond repair and it also had termites. The ad said rain-gutters and stainless for all your fenders. On a Mercury, that is significant, however all of the stainless was mashed and worthless and the rain-gutters were rusty and not useable. When I questioned the seller about his add, he commented, I did not say they were good, I said they were included. At that point, I almost backed out of the deal, but it was a 1946 Mercury and I wanted the car.
If in your quest, you find a car with excessive (more than 5%) rust, pass it up and wait for a car with very little to no rust, ultimately it will save you money and headaches and speed the project up by countless hours.
Point Two: Buy a car that is worth the restoration process. Almost all Woodies are worthy, but some, like the 1940-48 Fords are the most popular with the buying public. This will preserve the value of your project. Certain cars, like a 1928 Ford are not as road worthy, and not as popular, yet take as much time and money to restore as any other. I personally would advise against the earlier models.
Point Three: Virtually all motor and body parts are available for 1940-1951 Ford Woodies and there are several wooden body fabricators and restorers throughout the U.S. to help with the wood. Mercury motor parts are also readily available, but body parts are becoming increasingly difficult to find. An excellent source for Mercury body parts is Brownlee’s in Lawrenceville, Georgia. Mr. Brownlee has just about all of the hard to find parts.
The two major parts sources for all Woodies are Woodie Times classified section and E-Bay Motors. Woodie Times has provided me with several hard to find original parts from the attics of many NWC members. Like me, many members buy two or three of each of the parts they need for their projects and sell off the excess at the end of their project. I purchased many pieces of stainless trim, 2 NOS (new old stock) hubcaps, a hood ornament among several other priceless pieces using an ad in Woodie Times. It will take time but, it is worth it. To use the E-Bay Motors source, just find the E-Bay Motors website, type in Woody or Woodie, and also try 1946 Mercury or 1941 Ford, etc. You will be amazed at what you can find and how reasonably priced some of the items are. I have paid in some cases twice what something is worth, in other cases, half, but I have the parts I need and I am happy. If you are not computer literate, don’t feel bad, I wasn’t until I found E-Bay Motors. Ask your son, grandson or neighbor to show you how it all works. Otherwise you are missing out on one of the best sources of hard to find Woody parts and best of all, use of E-Bay is free.
Chevy, Pontiac, Buick, Plymouth, Chrysler, Hudson, Willy’s and the other major manufacturers of the era are difficult to find parts for and are expensive to restore. I would try to stay with Ford or Mercury if possible. It should be a faster restoration and less frustrating.
Other great sources for Ford and Mercury are: C&G Early Ford Parts, Dennis Carpenter Reproduction, Bob Drake Ford Parts, CW Moss, Le Barron Bonnie, Macs Antique Auto Parts.
Disassembly
No secret here, just take it apart any way you can. Make sketches of difficult to remember parts or part assemblies. Use a digital camera to photograph everything and every aspect of the dismantling process. It will be invaluable when you start reassembling later.
Depending on how far you take the car down, in my case it is a full frame off, you will need to acquire sketches and diagrams of the proper reassembly of certain segments. The parts sources I mentioned earlier all have diagrams in their free catalogues and they are accurate. Call all of them and ask for a catalogue from each. Also E-Bay Motors again offers books and literature which is inexpensive and is original literature from the period. I have purchased 7 books for less than $100 total on E-Bay Motors, and now have just about every sketch ever made. When you assemble something you should have your photos taken at disassembly and a book to cross reference, to be sure you are correct.

My son and I ran into significant difficulty with the rusted old bolts on both the body and the frame. We ended up using an air wrench and a blow torch to free up the tough ones. The tie rod ends were mangled and had to be replaced, but don’t worry, they are available as is every other frame part.
Put everything in baggies, mark the outside to remind you where they go and put them away until you return to them during restoration.
A good source for original nuts and bolts for an N.O.S/concourse type of restoration project is Roy Nacewicz. Ask for his catalogues, you won’t believe how much he has to offer.
Restoration and Rebuilding
The frame and drivetrain: I personally don’t have the tools or knowledge to go through and rebuild a flathead. In fact you would be lucky to find 5 honest and knowledgeable fellas that can do the entire rebuild on a flathead motor. I know of only two, Bill Robinson in Apple Valley, California and Tim Krehbeil of Nick Alexander Restoration. These two gentlemen are well recognized as industry leaders in their knowledge of the flathead and are no nonsense, can do technicians. Unfortunately, they are both backlogged for months, so get your motor to them early, if you choose to have one of them perform the work. Expect to pay about $4,000 – $4,500 for a complete rebuild including carburetor, starter, generator, new pistons, new rings, water pumps, all new bearings and original color paint for all components.
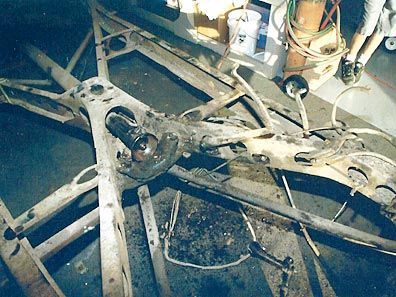
The frame on my 46 was in incredibly excellent shape compared to the rest of the car. I could have filled up to two 5 gallon buckets with the debris I washed out of the frame and rockers. I had very little pitting as a result of the years of oil leaking from virtually every part of the motor. This oil coated the entire under carriage and served as a rust prevention sealer.
One of the most valuable tools I purchased for the project was a $350.00 sand blasting kit from Auto Body Tool Mart. I already own a large compressor but a 5-7 horsepower Craftsman compressor would suffice. Be aware the smaller the compressor the longer the job will take and the harder on your compressor this part of the work will be.
Another essential element is a dryer on the compressor to remove moisture from the exiting compressed air. Without it, the moisture will build up in the sand blaster and virtually plug it up. I know because I spent many hours cleaning out the bottom of the sand blaster. All the while thinking my betcha-boy-howdy $80.00 dryer was working. It wasn’t and when I took it apart to finally check it, I found it completely full of water to the top of the cylinder. It was in fact doing nothing for me. I have since purchased a desiccant style dryer with replaceable desiccant beads. This is what the pros use and they cost about $350.00. Expensive but effective and good for many years to come. Keep in mind, this article will also cover painting of parts with a low VOC spray gun, you will need the same dryer for that as well, so bite the bullet and get one if you are going to attempt this work.
My son and I set the frame on the lawn and hooked up the blaster. It requires dry clean sand and will take up to 75 pounds to fill. The best sand available is Play Sand from Lowes at about $4.50 per bag. It is sifted and will prevent clogging. I tried 2 other cheaper types and the sand was not fine enough to go through the machine.
Once full, blasting mask in place, gloves, long sleeves and long pants, I gave it a try. It took a few minutes to adjust, turn the sand feed down so little sand is being used and the results are excellent. If you feed to much sand, the blasting is faster but it will cost a fortune in sand. Make sure you blast on a lawn or dirt lot, or you will be sweeping forever in your clean up. Do not try to reuse the sand, it will clog the machine. Keep a small piece of heavy wire or fine screw driver in your pocket in case the tip does clog, sometimes you can unclog the tip with a small probe, otherwise you have to remove the tip to unclog it. Be sure to be cautious with the blasting machine as it is powerful and can blast your skin off, but don’t be afraid of it, it is a wonderful tool and will be repeatedly used all the way through the restoration process.
As you blast the frame or any other parts, you will be pleased with the results. The frame and related parts come out beautifully cleaned and ready for primer or paint. You will want to use the blaster on anything with built up paint, grease or rust and you will achieve professional results with little effort.
The other option is to have all of your parts professionally blasted. It can be costly as well, probably the same as buying a blasting outfit and desiccant dryer. The advantage to doing it yourself, is it can be done in stages as you run into the need. In order to have parts professionally blasted, you need a bulk load for it to be economical. I like the convenience of doing 5 to 10 parts at a time myself and not having to haul parts back and forth to the sandblasting shop. I also have control over how well the material is cleaned. This is a choice you will need to make.
I blasted my frame, all front end parts, leaf springs and the entire cowl and floor. I did not do the rear end as I would eventually purchase a different Columbia overdrive unit for the vehicle. Be careful to cover all open holes where sand may contaminate an internal mechanism. Cover the brake bleeders with plastic or rubber caps for instance, keep the sand out of areas adjacent to or near oil. Sand contamination as horrible to deal with so be safe rather than sorry. Black tape is much better than any other, it is somewhat resilient to the sand blasting.